Infralib - Quickstart

Provision Kubernetes on AWS with integrations using the Infralib Agent.
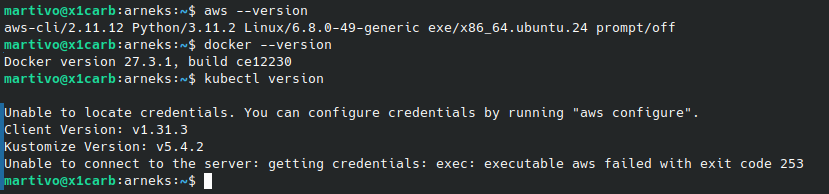
This quickstart guide assumes the following tools are available:
kubectl https://kubernetes.io/docs/tasks/tools/#kubectl
docker https://docs.docker.com/engine/install/
You will also need an AWS Account with Administrator privileges. We recommend using an empty account with no other resources in it to avoid any unintentional consequences.
There will be additional costs in the used AWS account from the resources created during this guide. The last chapter of the guide will show how to delete all the created resources.
The account should also contain a publicly resolvable Route53 DNS Zone where sub domains can be created.
Clone the "infralib-lab" repository that contains the example project.
$ git clone --depth 1 --branch main https://github.com/entigolabs/infralib-lab.git
Go to the example project directory.
$ cd infralib-lab/quickstart/iac
$ find .
Configure the Route53 DNS zone to use. The example project will create sub domains into the existing Route53 domain. The quickstart guide assumes the DNS zone is present in the same account.
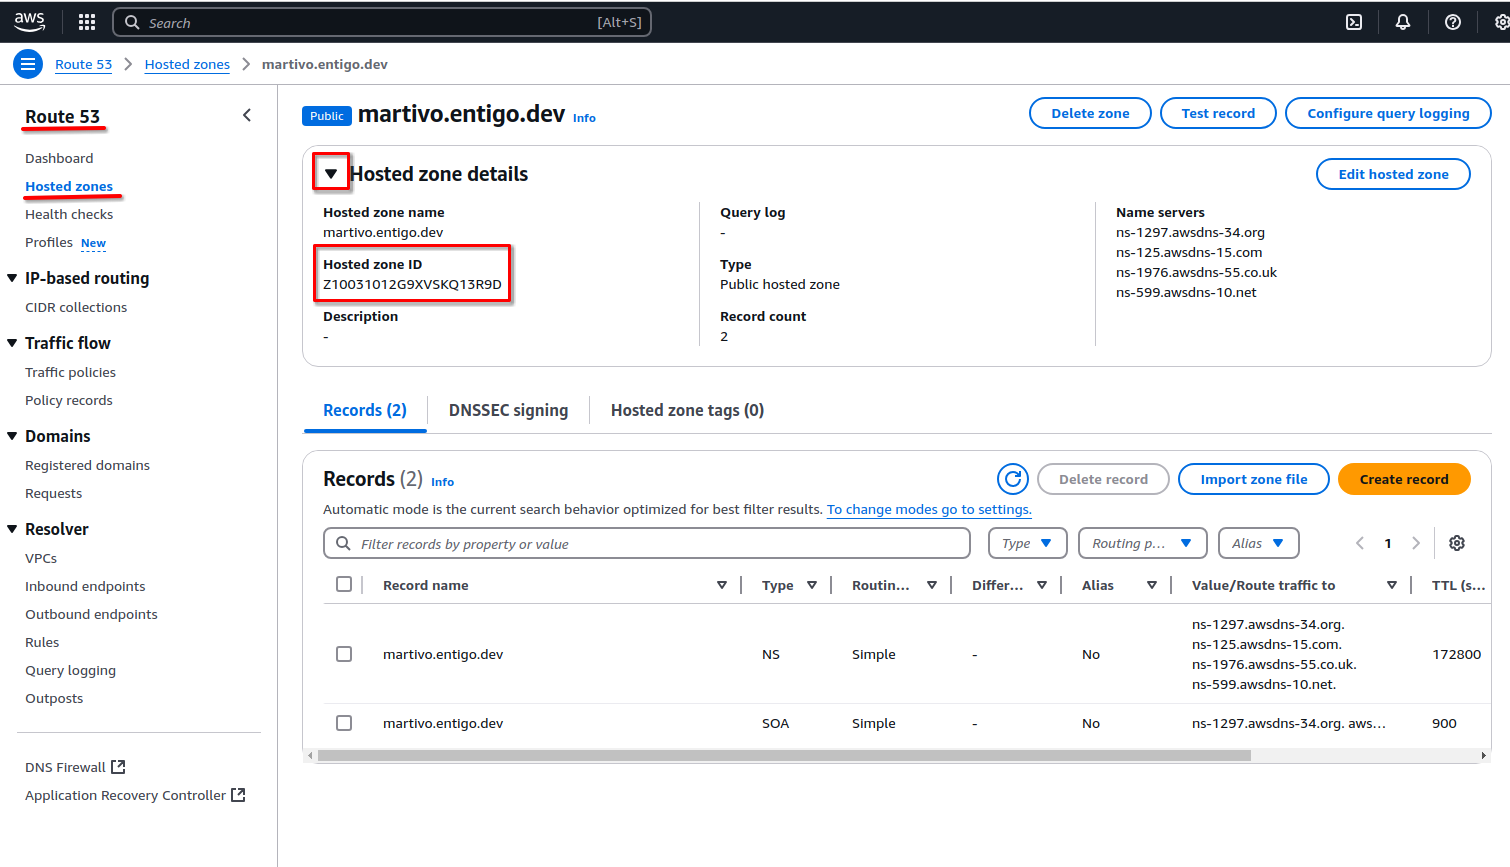
Set the Route53 Hosted zone ID value for AWS_ROUTE53_PARENT_ZONE.
export AWS_ROUTE53_PARENT_ZONE="..."
Configure it in the infralib Route53 configuration file under the "parent_zone_id" input variable.
$ perl -i -pe "s/^parent_zone_id:.*$/parent_zone_id: $AWS_ROUTE53_PARENT_ZONE/" config/net/dns.yaml
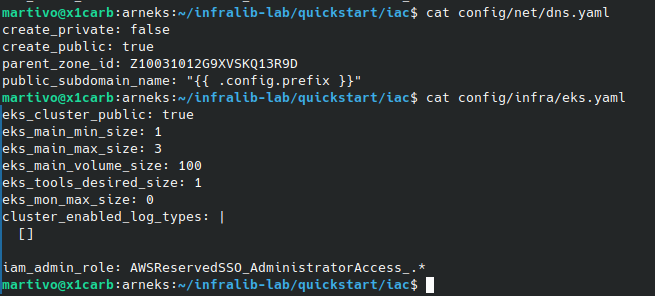
Verify the zone is configured in the "config/net/dns.yaml" file "parent_zone_id" field.
$ cat config/net/dns.yaml
Configure access credentials with Administrative privileges.
$ export AWS_ACCESS_KEY_ID="..."
$ export AWS_SECRET_ACCESS_KEY="..."
(Optional) You might have to set AWS_SESSION_TOKEN if temporary tokens are used.
$ export AWS_SESSION_TOKEN="..."
Configure a AWS IAM Role or IAM User to be an Administrator of EKS:
Option 1: Configure AWS IAM User.
To list existing AWS IAM Users:
$ aws iam list-users --output json | jq -r '.Users[].UserName'
Change the following command to your needs or skip it. Example value: john
$ echo "aws_auth_user: john" >> config/infra/eks.yaml
Option 2: Configure AWS Role. The current SSO role can be seen when clicking on the username in the upper right corner of the AWS Console.
To list existing AWS IAM Roles:
$ aws iam list-roles --output json --query 'Roles[?starts_with(Path, `/aws-service-role/`) == `false`]' | jq -r '.[].RoleName'
Change the following command to your needs or skip it. When using AWS SSO then one of the following wildcard values might work for you: AWSReservedSSO_AWSAdministratorAccess_.* or AWSReservedSSO_AdministratorAccess_.*.
$ echo "iam_admin_role: AWSReservedSSO_AWSAdministratorAccess_.*" >> config/infra/eks.yaml
Verify that either "aws_auth_user" or/and "iam_admin_role" is/are configured in the "config/infra/eks.yaml" file.
$ cat config/infra/eks.yaml
A configuration similar to the following should be present but it will be specific to Your environment.
Configure the AWS_REGION to be used.
$ export AWS_REGION="eu-north-1"
Use the Infralib Agent "run" command to create the infrastructure code, deploy pipelines and create all the cloud resources.
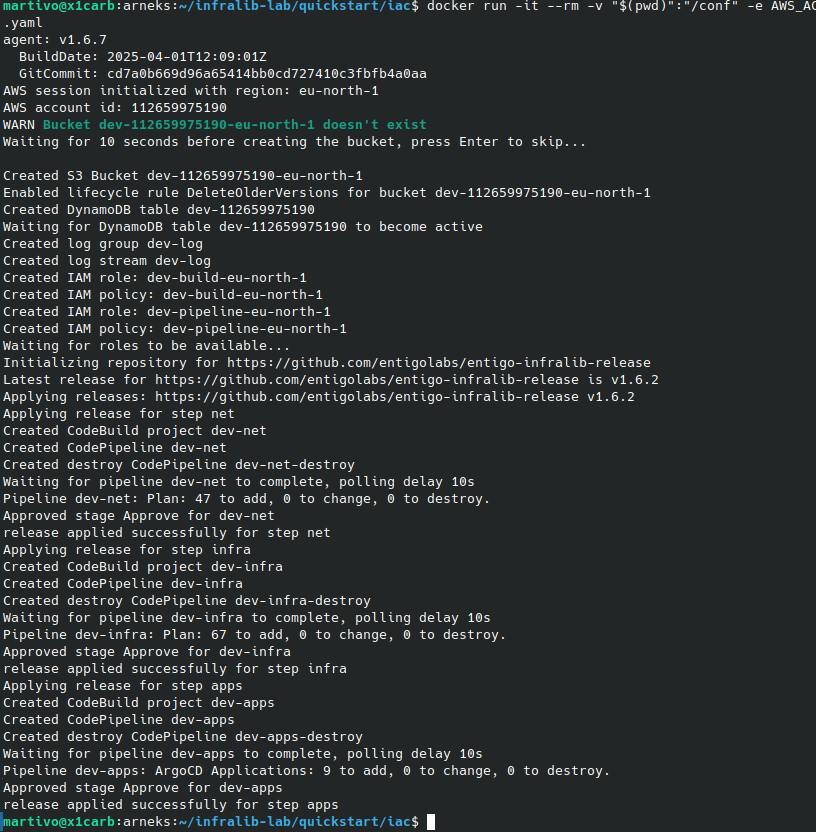
$ docker run -it --pull always --rm -v "$(pwd)":"/conf" -e AWS_ACCESS_KEY_ID -e AWS_SECRET_ACCESS_KEY -e AWS_REGION -e AWS_SESSION_TOKEN entigolabs/entigo-infralib-agent ei-agent run -c /conf/config.yaml
The console should display a similar log and the command will stay running for a while. Please continue with the quickstart without waiting for this command to finish, but do not close or cancel it.
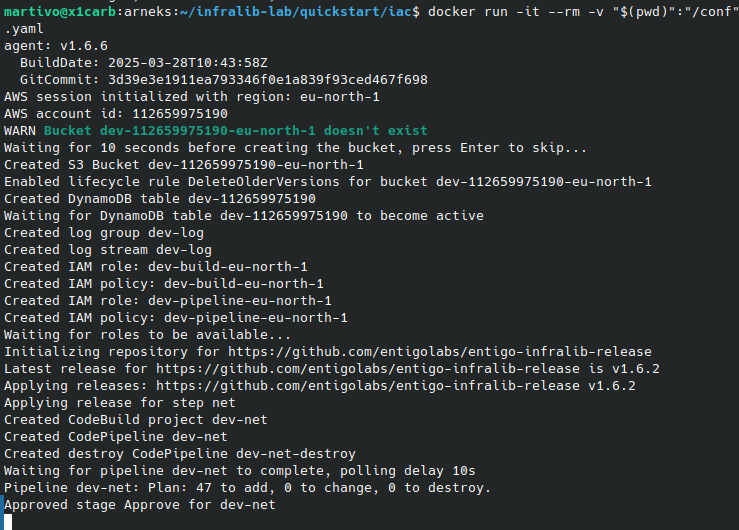
The cloud resource provisioning takes a while. Use this time to study the configuration and observe the operation of the Infralib Agent.
Click on the file names below to show the contents. It is the configuration file that the Infralib Agent "run" command was started with.
Show ~/iac/config.yaml +
sources:
  - url: https://github.com/entigolabs/entigo-infralib-release
prefix: dev
steps:
  - name: net
    type: terraform
    manual_approve_update: removes
    manual_approve_run: changes
    modules:
      - name: main
        source: aws/vpc
      - name: dns
        source: aws/route53
      - name: ecr-proxy
        source: aws/ecr-proxy
  - name: infra
    type: terraform
    manual_approve_update: removes
    manual_approve_run: changes
    vpc:
      attach: true
    modules:
      - name: eks
        source: aws/eks
      - name: crossplane
        source: aws/crossplane
  - name: apps
    type: argocd-apps
    manual_approve_update: removes
    manual_approve_run: changes
    modules:
      - name: argocd
        source: argocd
        inputs:
          argocd:
            server:
              ingress:
                annotations:
                  alb.ingress.kubernetes.io/group.name: external
                  alb.ingress.kubernetes.io/scheme: internet-facing
      - name: aws-alb-{{ .config.prefix }}
        source: aws-alb
      - name: crossplane-system
        source: crossplane-core
      - name: crossplane-aws
        source: crossplane-aws
      - name: external-dns-{{ .config.prefix }}
        source: external-dns
      - name: istio-base
        source: istio-base
      - name: istio-system
        source: istio-istiod
      - name: aws-storageclass
        source: aws-storageclass
      - name: metrics-server
        source: metrics-server
      - name: external-secrets-{{ .config.prefix }}
        source: external-secrets
Currently it has only one source - all the modules will originate from https://github.com/entigolabs/entigo-infralib-release.
This Infralib Agent configuration has three steps - net, infra and apps. The amount of steps and how they are named is up to the user to decide. However this is a commonly used configuration.
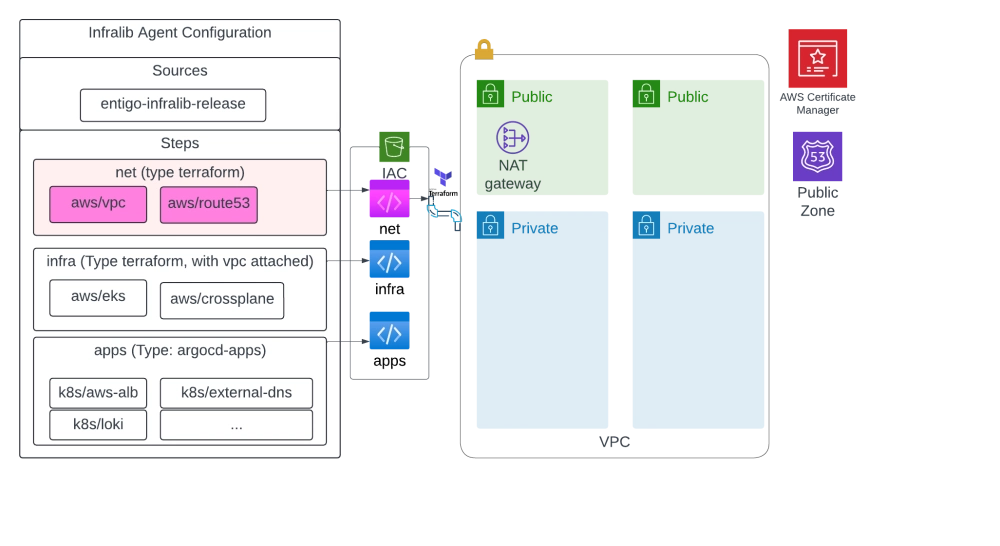
Step: net
The VPC, subnets, routings and nat gateways are created using the "aws/vpc" module. And it is called the "main" network.
The "aws/route53" module is named as "dns". It creates a public DNS zone using route53 and the TLS certificate for it using Certificate Manager.
The "dns" and "vpc" configurations are placed in separate files to make the configuration easier to read and manage.
Show ~/iac/config/net/main.yaml +
vpc_cidr: 10.112.0.0/16
one_nat_gateway_per_az: false
elasticache_subnets: |
            []
intra_subnets: |
            []
Show ~/iac/config/net/dns.yaml +
create_private: false
create_public: true
parent_zone_id: CHANGEME
public_subdomain_name: "{{ .config.prefix }}"
The "aws/ecr-proxy" module is named as "ecr-proxy". It creates AWS ECR Pull through Cache for public container image registires, such as Quay and Docker Hub.
Step: infra
This step is running in the private subnet that we created in the "net" step due to the "vps.attach" configuration.
This enables Terraform to communicate with the resources in the private subnets - even when the Infralib Agent is run externally.
The "aws/eks" module will provision a Kubernetes cluster with nodegroups.
The "eks" configuration is placed in a separate file.
Show ~/iac/config/infra/eks.yaml +
eks_cluster_public: true
eks_main_min_size: 1
eks_main_max_size: 3
eks_main_volume_size: 100
eks_tools_desired_size: 1
eks_mon_max_size: 0
cluster_enabled_log_types: |
  []
For the lab purpose the cluster is made available on the public network - the eks_cluster_public: true boolean changes it from the default value of false.
The "aws/crossplane" module creates needed permissions for the AWS Crossplane provider so we can create AWS resources using Kubernetes manifests.
Step: apps
In this step we install the much needed integrations into the Kubernetes cluster using ArgoCD.
The "argocd" application ingress annotations are changed for the lab purpose from the defaults. Here the "inputs" block is used to configure the module, unlike in the "net" or "infra" step. The configuration change makes ArgoCD available on the public network, the module defaults would not make it public.
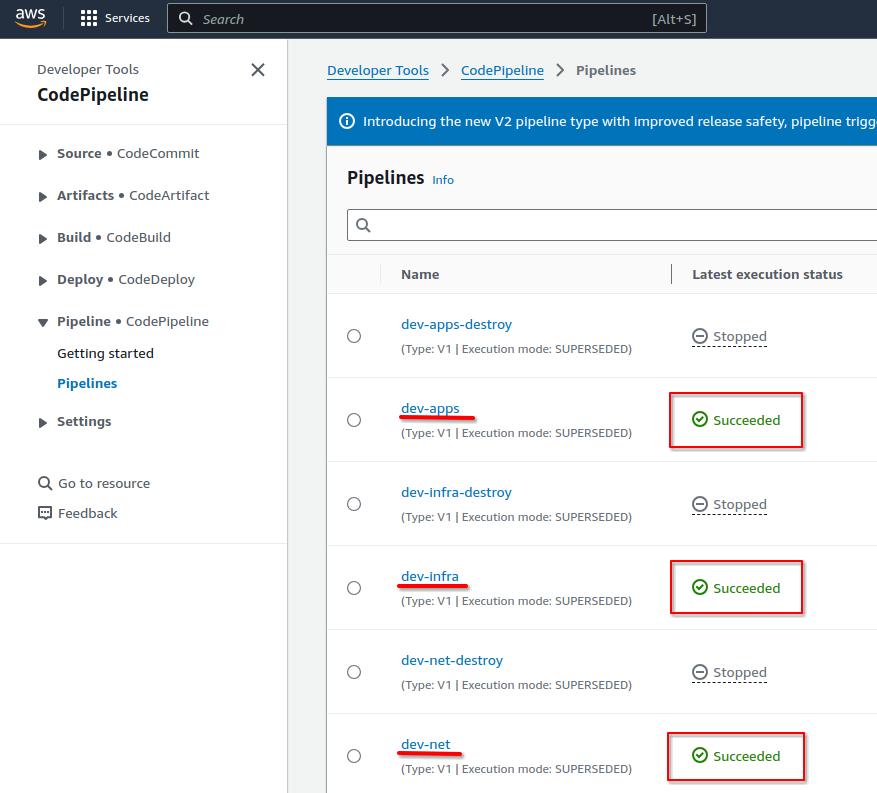
Find the CodePipeline job for the "net" step. https://console.aws.amazon.com/codesuite/codepipeline/pipelines
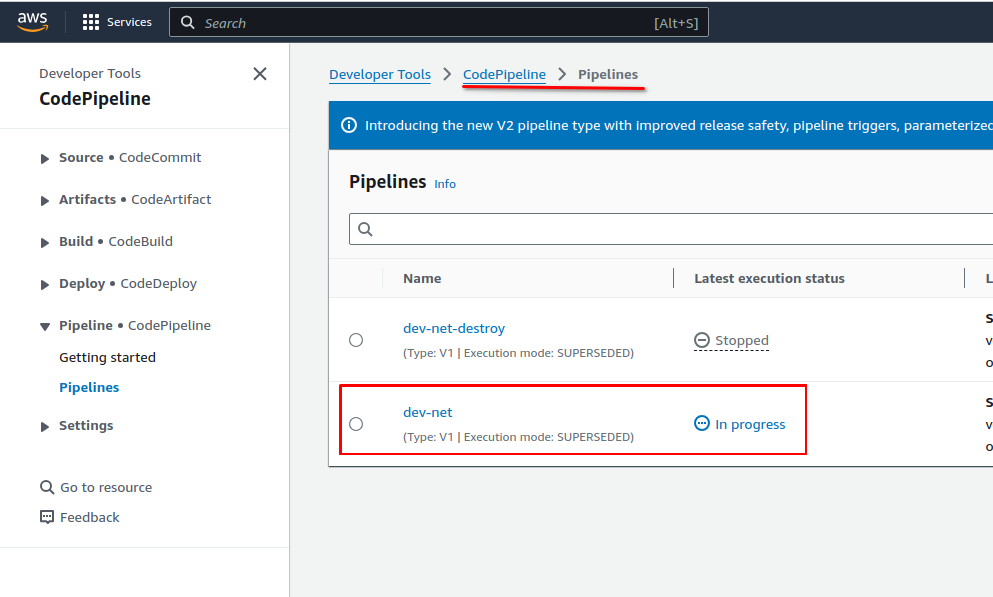
Click on the pipeline "dev-net" to see the pipeline Source, Plan, Approve and Apply stages.
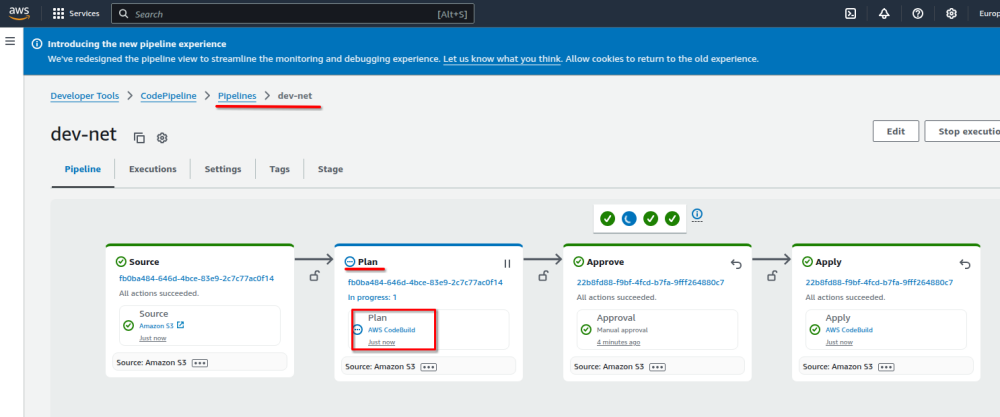
Click the "AWS CodeBuild" on the Plan stage to see the Terraform plan for this step.
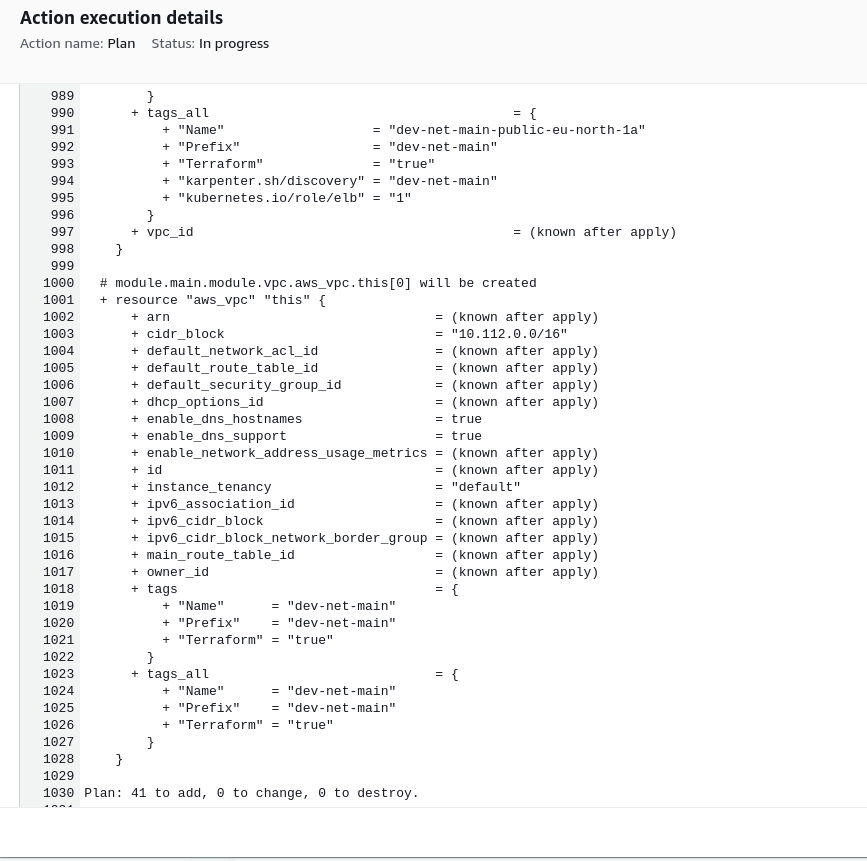
The Terraform plan only intends to create resources, as a result the Infralib Agent will approve it automatically.
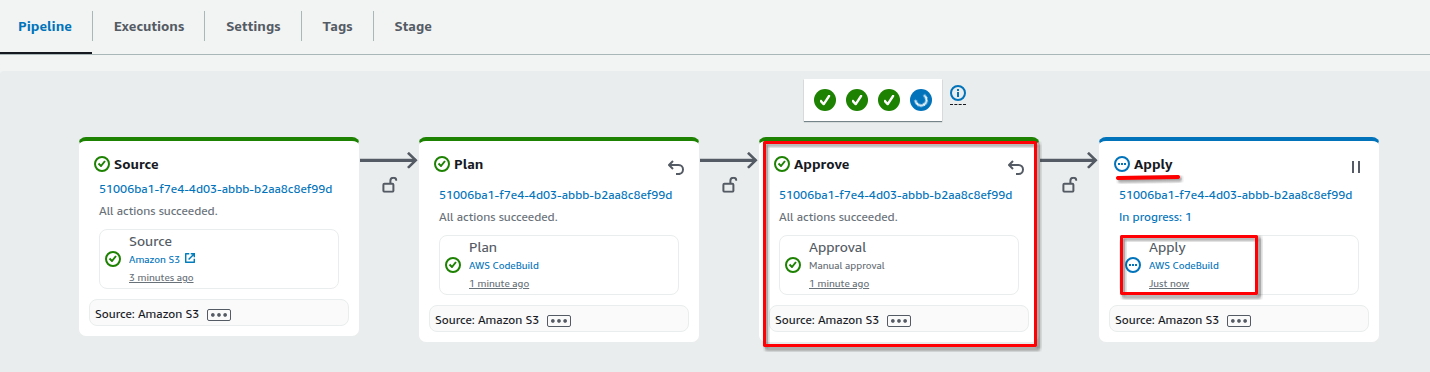
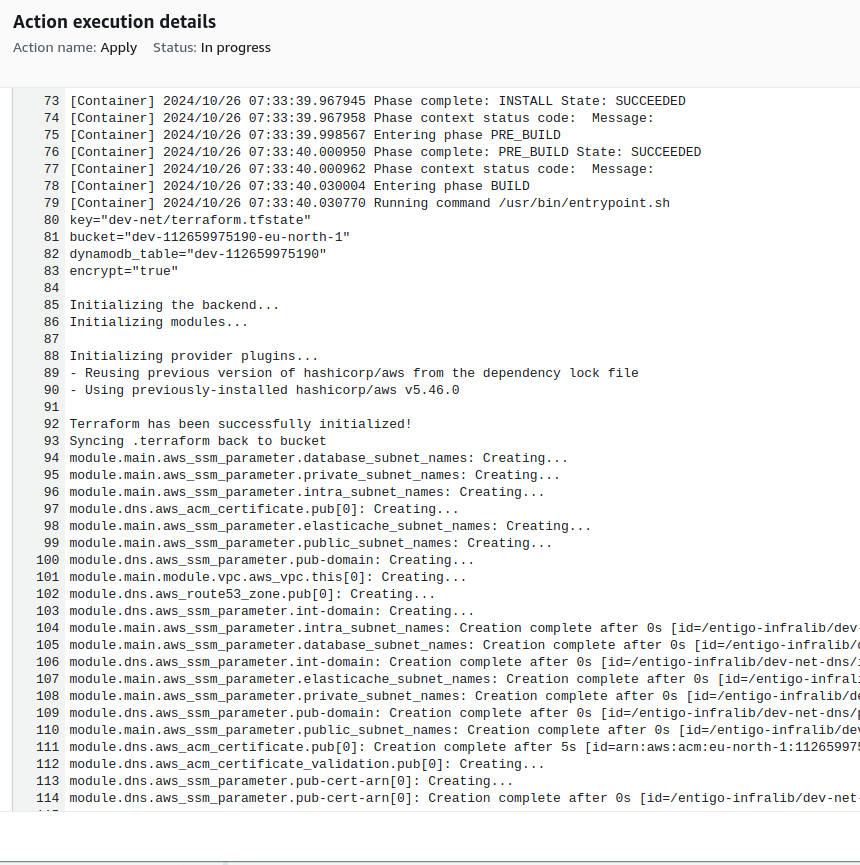
Access the Terraform apply log by opening "AWS CodeBuild" on the Apply stage.
Once the network step is complete the Infralib Agent will create similar pipelines for the "infra" and "apps" steps.
The "-destroy" pipelines are there to be able to remove all the created resources. By default these pipelines are disabled to prevent accidental deletion of resources.
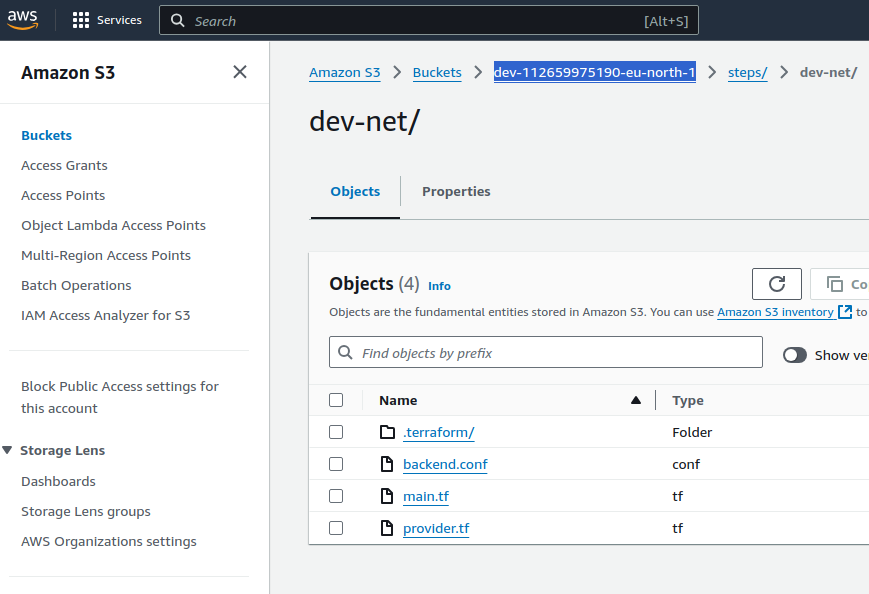
The generated infrastructure code has been placed into a S3 bucket.
Navigate the S3 service. https://console.aws.amazon.com/s3/buckets
Open the only bucket starting with the "dev" word and followed by account number and region.
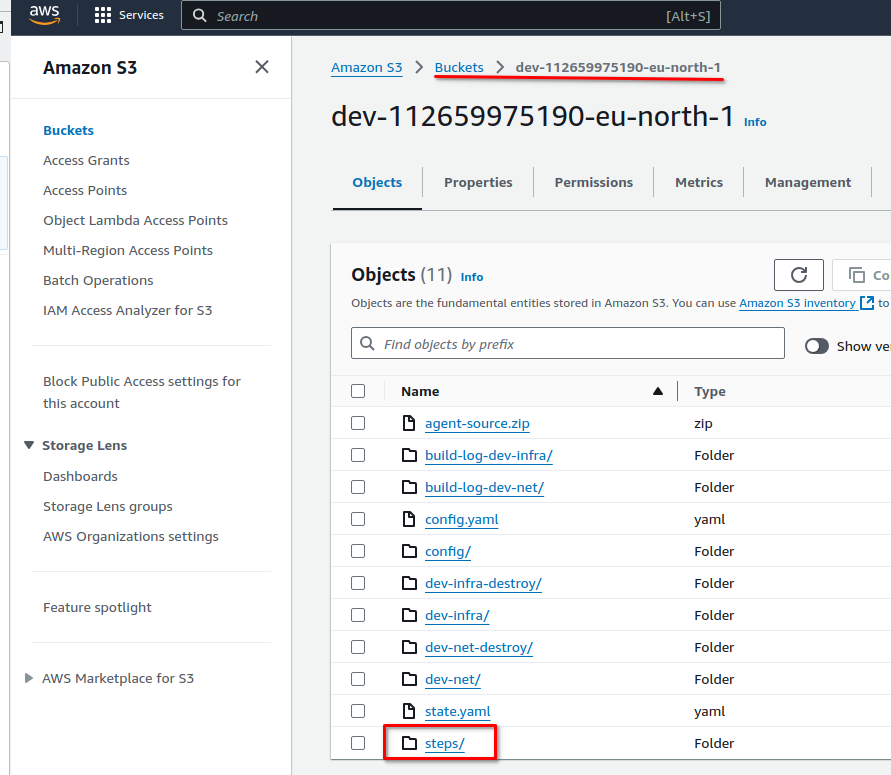
The generated infrastructure code is placed in the "steps" folder and each step has its own sub folder.
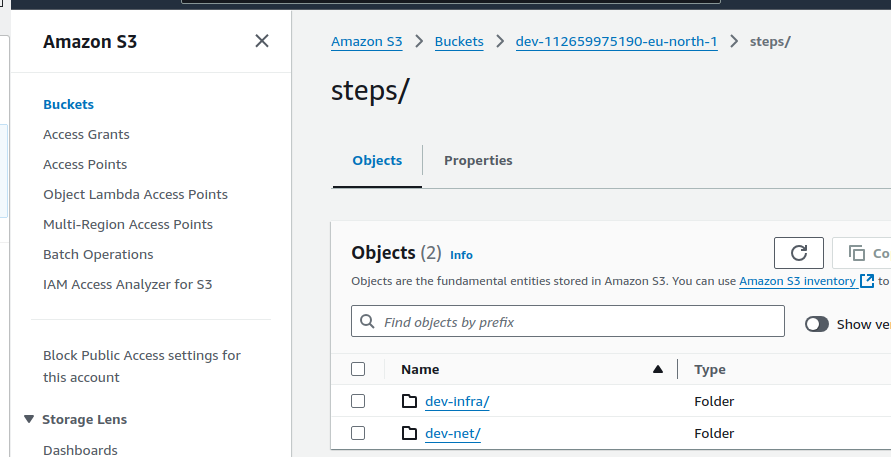
The generated infrastructure code is stored here. It is updated by the Infralib Agent during configuration changes or updates.
Monitor the pipeline logs and explore the created resources (VPC, Certificate Manager, Route53, Elastic Kubernetes Service).
Please wait for the Infralib Agent "run" command in the terminal to finish executing before proceeding. It will take about 30 minutes total.
When everything is completed - the Infralib Agent has provisioned the infrastructure code and the infrastructure.
The default naming scheme of the resources is prefix - step name - module name. This makes it easy to track the created resources and find their configurations.
A summary of the created resources:
A VPC called "dev-net-main". https://console.aws.amazon.com/vpcconsole/home#vpcs:.
Subnets for public, private and databases in two zones with the required routes and NAT gateways. https://console.aws.amazon.com/vpcconsole/home#subnets:
A new DNS zone for the domain "dev.Your parent DNS zone".
Added the DNS zone NS records into it's parent zone. https://console.aws.amazon.com/route53/v2/hostedzones#
A wildcard certificate for the domain https://console.aws.amazon.com/acm/home#/certificates/list
The AWS EKS Kubernetes cluster is provisioned with Add Ons and Node Groups https://console.aws.amazon.com/eks/home#
The essential integrations are also installed into the Kubernetes cluster.
Configure the AWS Account number for fetching the generated infrastructure code.
$ export AWS_ACCOUNT=$(aws sts get-caller-identity --query Account --output text)
To investigate the generated infrastructure code more conveniently use the aws cli to copy it. The ".terraform" folder is excluded, it is used for caching the Terraform modules and providers.
$ aws s3 cp --recursive --exclude '*/.terraform/*' s3://dev-$AWS_ACCOUNT-$AWS_REGION/steps ./quickstart_s3
Network step
$ ls -l ./quickstart_s3/dev-net/
$ cat ./quickstart_s3/dev-net/main.tf
Infra step
$ ls -l ./quickstart_s3/dev-infra/
$ cat ./quickstart_s3/dev-infra/main.tf
Apps step
$ ls -l ./quickstart_s3/dev-apps/
$ cat ./quickstart_s3/dev-apps/external-dns-dev.yaml
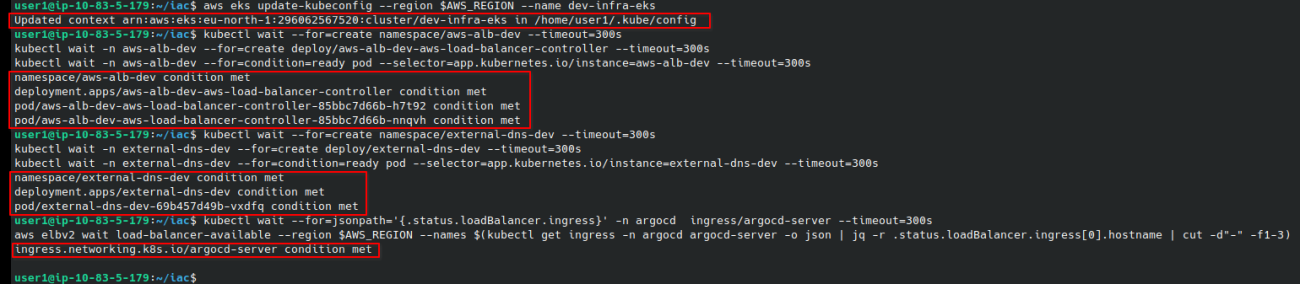
Configure the "kubectl" context with aws cli to access the created Kubernetes cluster
$ aws eks update-kubeconfig --region $AWS_REGION --name dev-infra-eks
Some of the Kubernetes resources are still being created, use the following commands to make sure they are fully operational. The commands will output "Condition met" when the resources are ready for use.
Wait for the AWS ALB controller to be started so Ingress objects can create AWS Application Load Balancers.
$ kubectl wait --for=create namespace/aws-alb-dev --timeout=300s
$ kubectl wait -n aws-alb-dev --for=create deploy/aws-alb-dev-aws-load-balancer-controller --timeout=300s
$ kubectl wait -n aws-alb-dev --for=condition=ready pod --selector=app.kubernetes.io/instance=aws-alb-dev --timeout=300s
Wait for the External-dns integration to be started so the DNS records for the Ingress objects can be created in AWS Route53.
$ kubectl wait --for=create namespace/external-dns-dev --timeout=300s
$ kubectl wait -n external-dns-dev --for=create deploy/external-dns-dev --timeout=300s
$ kubectl wait -n external-dns-dev --for=condition=ready pod --selector=app.kubernetes.io/instance=external-dns-dev --timeout=300s
Wait for the ArgoCD Ingress Load Balancer to be provisioned to be able to access ArgoCD web interface.
$ kubectl wait --for=jsonpath='{.status.loadBalancer.ingress}' -n argocd  ingress/argocd-server --timeout=300s
$ aws elbv2 wait load-balancer-available --region $AWS_REGION --names $(kubectl get ingress -n argocd argocd-server -o json | jq -r '.status.loadBalancer.ingress[0].hostname' | cut -d"-" -f1-3)
Fetch the generated ArgoCD admin password and log in to the web interface.
$ kubectl -n argocd get secret argocd-initial-admin-secret -o jsonpath="{.data.password}" | base64 -d | xargs echo
Get the URL of ArgoCD
$ echo "https://$(kubectl -n argocd get ingress argocd-server -o jsonpath='{.spec.rules[0].host}')"
The username is "admin" and the password is in the output of the previous command.
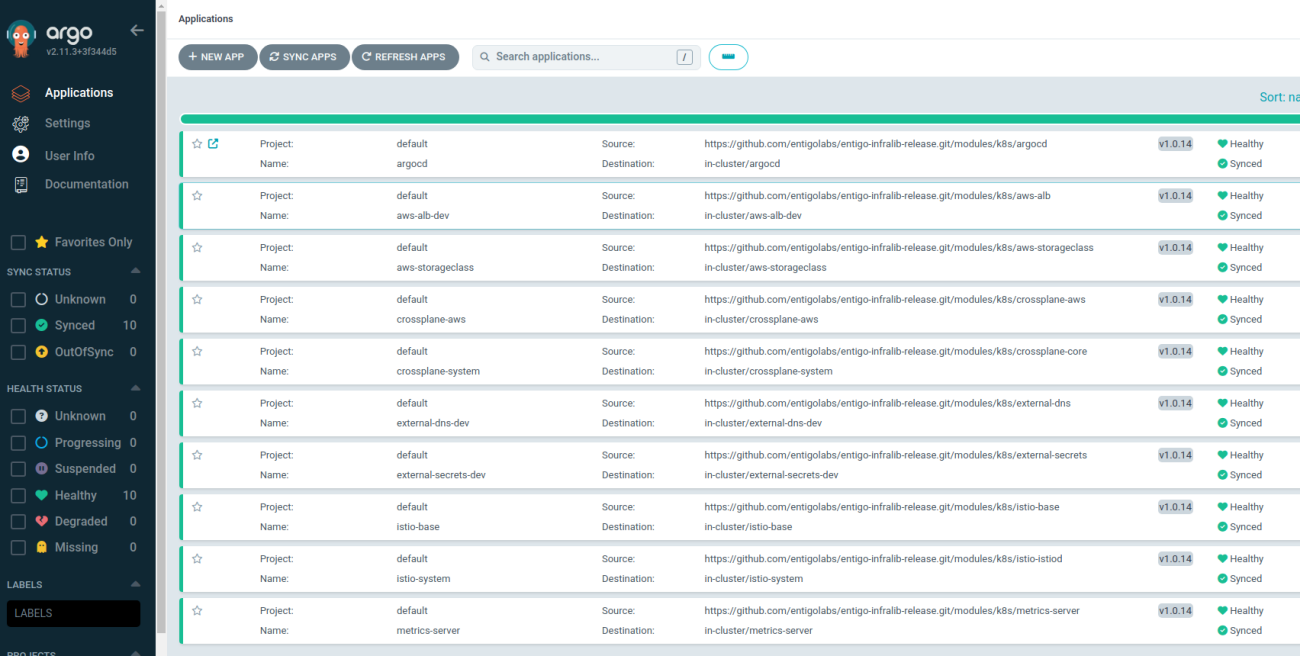
Notice that in ArgoCD all the needed integrations are already installed as requested in the configuration.
ArgoCD web UI also relies on multiple integrations itself:
"aws/route53" - for DNS zone and TLS Certificates.
"k8s/aws-alb" - To create Application Load Balancer in AWS for Ingress objects.
"k8s/external-dns" - create the required DNS record for Ingress object.
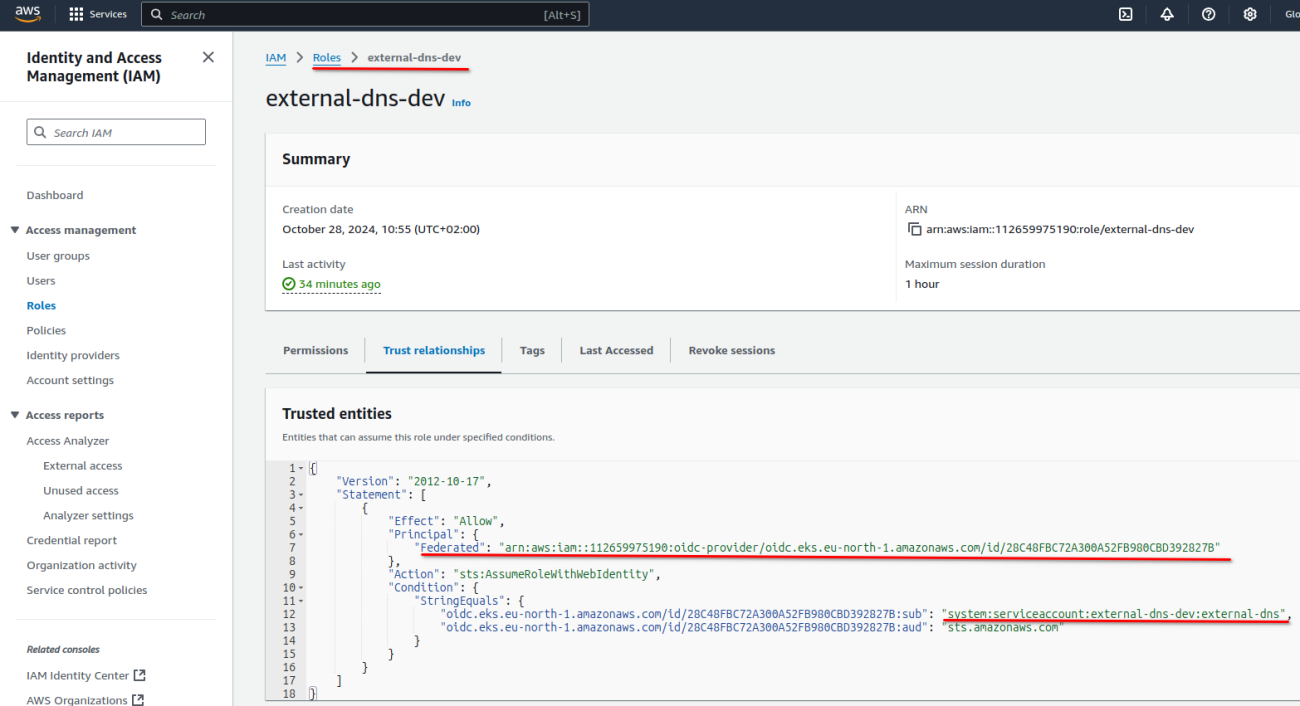
Open the "external-dns-dev" ArgoCD application and see that the AWS IAM resources are also created. This confirms the AWS Crossplane provider is operational too.
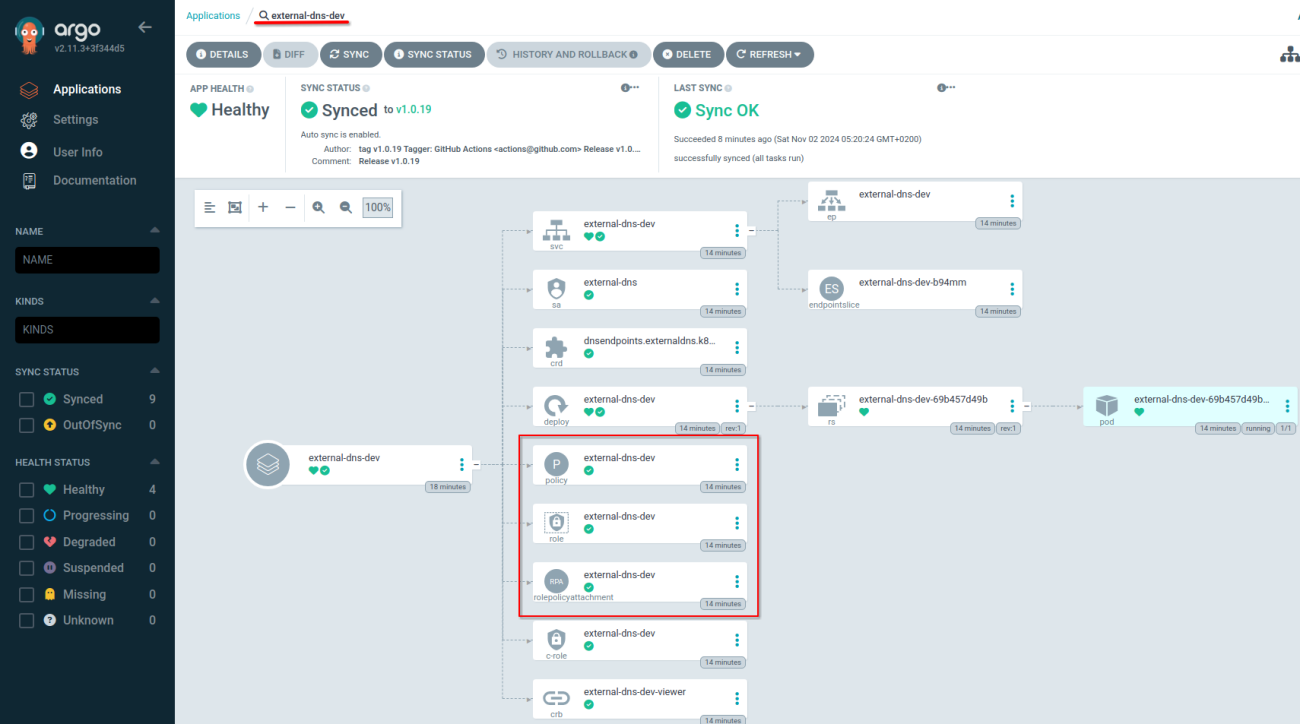
The created role and policy can be seen in the AWS Console under IAM and roles. https://console.aws.amazon.com/iam/home#/roles
To dig deeper into Infralib and Infralib Agent continue to "Bootstrap". https://infralib-quickstart.dev.entigo.dev/2
Or go to "Cleanup / Uninstall". https://infralib-quickstart.dev.entigo.dev/5